Introduction This guide by Warden Mike will walk you through the process of creating a custom prison using the official The Escapists Prison Editor program. After reading, you’ll have all the know-how you’ll need to build a fully functional prison facility for other players to explore and escape! You can skip to specific sections of this guide by using the navigation window on the right of the screen, or by using Ctrl+F to search for a phrase related to the area you want to read. Designing Your Prison When designing the prison you want to build, there’s a few things you need to keep in mind: • It should be secure: Remember – prisons are designed to keep prisoners in! The simplest way to make sure that prisoners don’t walk out in minutes is to build a solid outer wall. But there’s other options too – explore moats, mines, fences, snipers… • …But not too secure: If you want players to review your prison kindly on the Steam Workshop, you’ll need to give them a challenge that they can beat. Test their skills and make them work for their escape, but make sure that your prison has a weakness to be uncovered and exploited. In fact, it’s often best to design your prison around this weakness to ensure that there’s always a way out of your creation. • Give it a “thing”: What will be unique about your prison? What will make it stand out as a new and interesting challenge for The Escapists players? Make sure your prison has a stand-out feature that players will want to explore and conquer! • Think logistics: It’s all good and proper making a beautiful prison with 16 different buildings with a complicated system of corridors and checkpoints, but if your prisoners can’t get from the canteen to the roll call area in time to see who is getting cell tossed – it’s going to be a frustrating experience. Make sure there’s a logical path through the prison and avoid sending inmates from one side of the map to the other every few minutes. Once you’ve got some ideas down on paper, boot up The Escapists and click “Map Editor” on the game launcher. Let’s get building! First Steps Once you start the Prison Editor and select "New Project" from the main menu, you’ll land be asked to give it a name and a tileset. 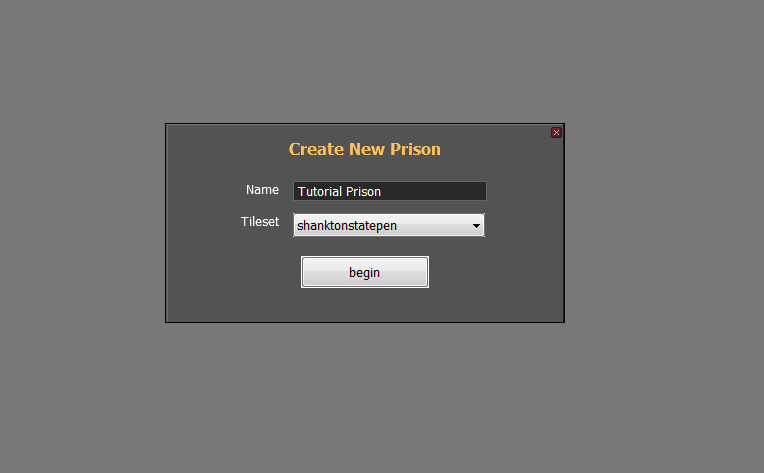 Name: Sets the name of your prison in-game and on the Steam Workshop. Be sure to choose a name without any bad language, else you won’t be able to upload your prison later. Tileset: Changes how the tiles (objects used to build your prison) in your prison look. You can choose from any of the existing tilesets from the main prisons. Set these options, then click begin! The Properties Menu The next thing you’ll see is the Properties menu. This menu lets you set many options relating to how your prison behaves in-game and how it appears on the Steam Workshop. You’ll find a drop-down box at the stop of this menu with 3 options, let’s start with the “main” window: 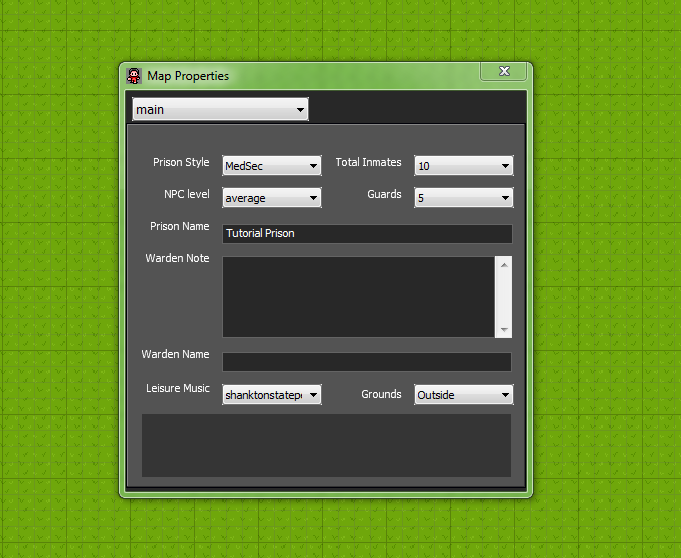 Main: • Prison Style: This sets the style of your prison, and its routine structure, ranging from MinSec (easy-going routine like Centre Perks) through to MaxSex (a tight schedule for inmates, like HMP Irongate. Be warned, this also arms the guards with Stun Batons). You can also select Camp if you’d like your prison routine to be more like Stalag Flucht or the Jungle Compound. • Total Inmates: The number of prisoners that your prison will house. Each prisoner will need a bed, desk and several other amenities - so this impacts how large your prison and its facilities will need to be. • Guards: Defines the number of guards on patrol in your prison. Each guard will need their own amenities too, so bear this in mind when setting a number. Also remember that raising the guard count will likely raise the difficulty of your prison! • NPC Level: Defines the stats for each of the prison’s non-player characters. Low means that inmates/guards will start out with a higher opinion of the player and be fairly weak, whereas high will do the opposite. • Prison Name: Another opportunity to change the name of your prison. • Warden Note: Write the letter that the player receives when they first start playing your prison. You can use line breaks here, but try to avoid making your Warden Note too long or it may not be displayed properly. Always keep the language clean for the kids, lest your prison face the wrath of our eagle-eyed moderators. • Warden Name: Choose the name of your prison’s warden! Puns are encouraged, but keep it clean or face the wrath of the mods. • Leisure Music: Choose the background music for your prison! • Grounds: This defines where your prison’s inmates can go without getting shot at. - InsideOnly means that if a prisoner steps on any “ground” tiles (eg – grass) they will be considered out of bounds and will be shot at by the nearest tower guard. You can define safezones that ignore this rule later. - InsideOutside means that ground tiles are accessible as long as the outside doors are unlocked. If a prisoner is on a ground tile after hours, they will be considered out of bounds. Again, you can set safezones later. - Outside means that all of the prison is accessible to inmates, they won’t be shot if they go outside – even if the outside doors are locked. Camp style prisons should use this setting as the majority of the prison will be outdoors! The “Grounds” option is particularly important. Make sure you set this correctly to suit the style of prison that you’re building. If you don’t expect your prisoners to set foot in open air as part of their routine, set the option to InsideOnly. If you want them to freeze their behinds off in the winter breeze, be sure to set the Outside option. Jobs: The jobs window lets you set which jobs will be available in the prison. Simply check the boxes to turn jobs on or off. You can also set whether the player starts with a job or not using the dropdown menu at the top of the window. 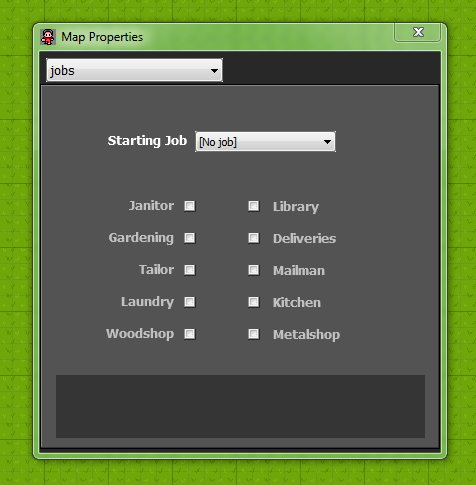 Be warned, the more jobs you add, the more facilities you’ll need to build. You can’t have the woodshop job without the woodshop! Perimeter: Here you can set the “out of bounds” area for your prison. If a player is found within this area (marked pink on the map) they will be shot at or battered by the guards. You can set the perimeter by choosing how many squares from the edge of each side of the map it will extend.  Once you’ve defined each of these options, it’s time to get stuck in to building! Saving and Loading You now have a Prison Editor “project”. This is the file that contains your map and its settings as you’ve defined them so far. It’s important to save your project regularly. You should also back up your project whenever you make significant changes so that, if they don’t work out, you can quickly revert to a previous version. To save your project: Select “Project” in the main menu and then “Save”. Define a name for the save file and confirm. Your project is saved! To back up a project: Simply save the project using a different file name (eg – “My Prison (v1)”) To load a project: Select “Project” in the main menu and then “Load”. Choose the file name you wish to load and confirm. To quickly load a recent project: Select “Project” in the main menu and then “Recent”. Click the name of the project you wish to load. 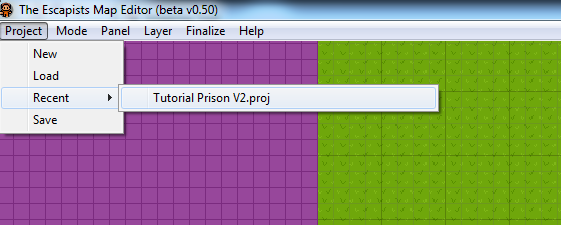 Painting Your Prison Let’s get those walls up! On your screen, you will see the “Tiles” window (if not, go to the main menu and click “Panel” > “Tiles” to show it). This window contains the tiles you can place on the map to form your prison. Hovering over a tile in the Tiles window will show its description 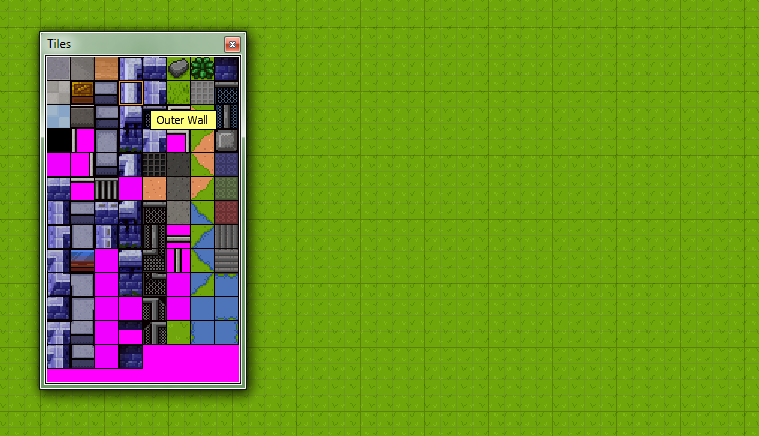 Click on the tile you wish to use, then place it onto the map by clicking the left mouse button. You can click and drag to repeatedly paint the selected tile onto the map as you move the mouse, as I’ve done here with this Outer Wall: 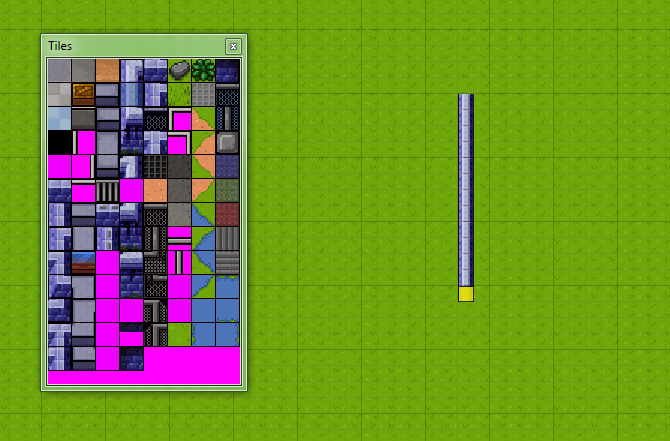 When you’re done with a tile, just click another in the Tiles window and carry on painting! Alternatively you can CTRL + Click any tile on the map to select that tile to paint with. If you would like to fill an area with a tile, you can do so by pressing and holding the right mouse button to draw an area. Release the right mouse button to fill that area with the currently selected tile. Perfect for flooring: 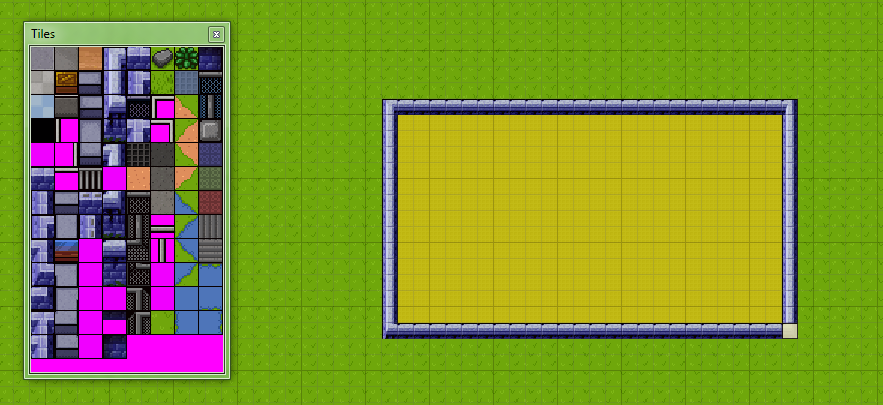 If you make an error, it’s time to enter erase mode: 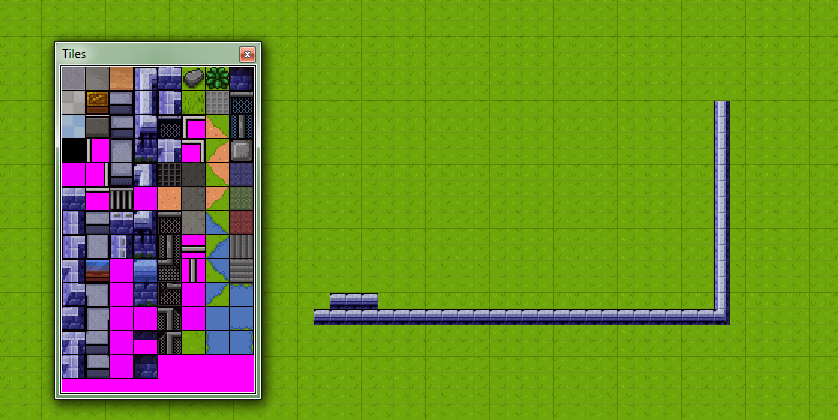 On the main menu, click “Mode” > “Erase” to enter erase mode. Whilst erase mode is enabled, the cursor will turn red and anything you click on the map will be instantly annihilated! Just be sure to switch back to paint mode before continuing with your construction. If you’d like to undo the last change you made, you can press CTRL + Z to do so. If you’d like to erase an entire area, draw the area by clicking and holding the right mouse button whilst erase mode is active, then release to clear the area of tiles. Many of the tiles in the Tiles window are designed to be placed next to eachother. You’ll find straight wall sections, wall corners, bricks designed to be placed at underneath walls to give a sense of height, lakes, fences – even the glass window for your visitation area! Play around with different combinations of tiles to see what you can create: 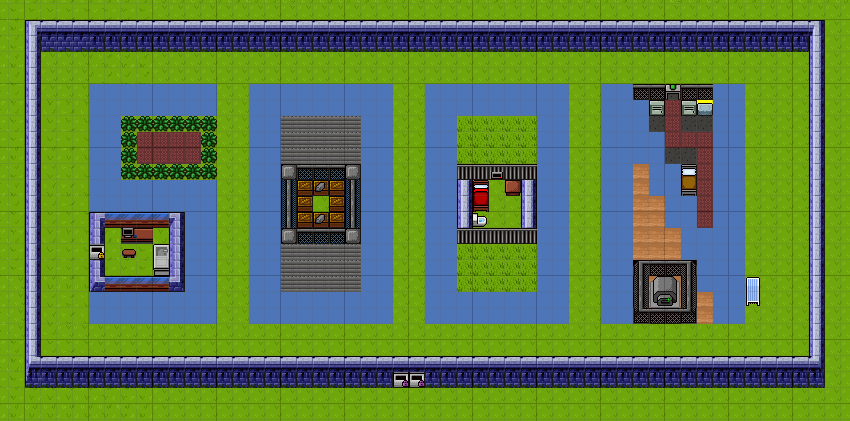 Adding Objects You’ve got the basic structure of your prison by now, complete with walls and buildings. Now, it’s time to add some moving parts! Objects bring your prison to life. To access the Objects window, click “Panel” in the main menu and select “Objects”. This window will appear:  The dropdown menu in this window will let you switch between different categories of object: • Doors, unsurprisingly, contains doors. There are many different types and they behave differently in certain situations. Hove over each door to see more about its usage. Here are the most important: - Cell Doors allow prisoners to access their cell, and lock them in at lights out. - Outer Doors open after 10AM and close at 10PM. Depending on your “Grounds” setting, prisoners caught outside of these doors after they lock may be subject to punishment. - Utility Doors require a utility key to enter - Kitchen / Laundry / Metalshop / Library etc doors can only be accessed by prison staff, and the inmate who is currently employed in the related job. - Staff Doors require the staff key to enter. - Master Doors can be accessed by staff, but do not have a key. These can only be unlocked during a prison takeover. - Vents Utility Door can only be placed in a vent system and require a utility key to enter. • Cells contain the objects you should put into cells. Note that there are separate objects for NPC inmates and the player, allowing you to set the cell that the player will have. Many of these items are also mandatory – you can’t make prisoners sleep on the floor, for example, so make sure everyone has a bed. • Gym contains everything your inmates will need to build their speed and strength stats. You need as many pieces of equipment in your prison as there are prisoners, but you can mix that equipment up however you see fit. • Jobs holds job related objects including delivery vans, timber, washing machines and more. Be sure to hover over the objects to learn more about their usage. You’ll need to make sure that your prisoners have all the equipment that they need in order to do the jobs that you made available when you first started making your prison. • Waypoints holds objects that you can place on the map to tell NPCs where to go or where to spawn. These objects aren’t visible to the player when they play your map. Hover over the icon in the Objects window to learn more about its use. A quick note about spawn waypoints – ensure that you only place one of each of these in your map, and that the spawn point isn’t blocked by any surrounding objects. • Security contains objects that will keep inmates in check. There’s CCTV and contraband detectors here as well as the power generator and spotlight. You’ll also find tower guards, who will shoot at rule breaking prisoners. There’s 2 other objects of note here: - Guard Bed – off duty guards will sleep on site, so you need to place a few of these in your prison. - Mine Zone – This can only be placed in the underground layer and randomly spawns mines. If a player walks over a mine on the ground layer - BOOM. Warning: do not place underneath guard barracks. • Misc hosts a plethora of interesting stuff that we couldn’t find a category for: - Visitation Chairs for inmates and prisoners. Make sure you use the correct one! - Internet Terminal for your daily lolcat - Vent Slats / Covers that can be placed in the Vent layer to add barriers to escaping cons - Medical Supplies for your NPC medic, and anyone else who gets their mitts on them - Ladders that gran access from the Vent layer to the Roof layer - Bookshelves for that INT stat – NERD! - Canteen Chairs/Food are essential items. You need as many of the chairs as there are prisoners, and you’ll need a couple of food collection points too - Tables for your prisoners to eat their food at - Prisoner Stashes for that RNG loot - Cutlery Tray because there are never enough plastic knives to go around for some reason - Cabinets let prisoners play Solid Snake - Sun Loungers for that Centre Perks effect - The Kitchen Sink. No, really. - Infirmary Bed for your wounded prisoners - Solitary Confinement bed for those really, really naughty prisoners - Light Sources light up the local area when it starts to get dark. • Jeep contains waypoints for jeep patrols. Place these on the map to point your jeep around its patrol route. Always make sure that the arrows lead directly to another arrow on the map in a complete loop. • Zipline contains zipline posts that can only be placed on the roof layer. Use the post with the arrow that points in the direction that you want your zipline to travel in. You’ll then need to end the zipline with a small post in-line with the original zipline post. Layers Ah, your creation is beautiful. You’ve got walls, you’ve got doors, you’ve even gone and got yourself a jeep patrol that drives haplessly through the middle of the prison. Hold those metaphorical horses there Warden, there’s still work to be done! There are 5 layers for you to add content to in The Escapists Prison Editor: • Ground is the layer that you’ve been editing so far and is where most of your inmates and staff will spend their time. • Underground is the layer that players will find themselves should they decide to make a hole in your newly decorated kitchen (or anywhere else for that matter) • Vents is the layer that prisoners will go to if you provide a way for them to access the vent system. • Roof is where your prisoners will be if they climb a ladder from the ground or vent layers. You can place special objects, such as tower guards, spotlights and ziplines on this layer • Zones is a very special layer that the player never sees. We’ll go into this in more detail later. To switch between layers whilst creating your prison, hit the “Layer” option on the main menu and select the layer you wish to edit. Remember that there are some objects and tiles that should only be placed on specific layers – be sure to read the description of the object/tile by hovering over it with your mouse before using it. You do not need to use the roof, underground or vent layers at all if you don’t want to. However you must use the zones and ground layers in order to make your prison work. Zones Zones are extremely important for your map to work correctly in-game. Zones tell the game which areas house the vital areas of your prison, such as the Canteen, Gym and prisoner/player cells. You must define several zones before you’re able to publish your prison and they’re usually the last thing you’ll add to your creation. They are: • Solitary Confinement: Players will be sent to this zone if they do something really, really bad. • Player Cell: This zone should be placed over the cell which contains the Player Desk and Player Bed objects. This zone lets the game know that the player has permission to be in that cell (because he/she owns it). If this isn’t set correctly, you may find that guards tell the player to get out of their own cell and beat them when they refuse amongst other weirdness. • Cells 1, 2, 3 etc: Draw these zones over cells which do not belong to the player. If the player goes into these cells and is discovered, guards will chastise them. You may place this zone over multiple NPC cells. • Roll Call: Tells the game where roll call takes place. If the player is not inside this zone whilst roll call is taking place, the guards will trigger a lockdown. • Canteen: This zone tells the game where the player should be during meal times. Heat will rise if the player is not in this zone during meals. • Gym: Just like the canteen, this zone tells the game where the player should be during exercise periods. • Job Zones: Tells the game where each employed prisoner should go to find the tools to do their job. You’ll need to set these according to the jobs you’ve made available in your prison You’ll also find the Safe Zones. These are optional zones that can be placed on the map to tell the game that players found in this zone ignore the rules set in the “Grounds” setting. For example, if your “Grounds” setting is set to inside only, you can define a safe zone outside which players are allowed to be in. Be warned, if the player steps outside the safe zone whilst outside in this scenario, they’ll be subject to swift and brutal punishment. Use with care. To define a zone: 1. Go to “Layer” > “Zones” on the main menu 2. Click and drag a selection box over the area you wish to designate as a zone 3. A dropdown menu will appear after you release the left mouse button. Choose the type of zone you wish to assign to the box you drew from the available selections. 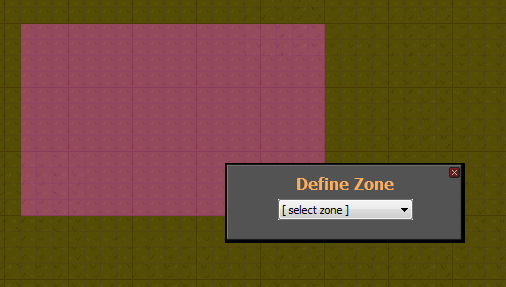 Finishing Up You’ve built your prison, you’ve added objects and you’ve created all sorts of interesting escape routes and traps for your players across all of the different layers that they can access. You’ve told the game what it needs to know by adding in zones and now you’re confident that your map kicks all the buttocks. Well done! You’ll be the most popular creator on the Steam Workshop in no time at all. There’s a couple of final steps to take before you can show your prison to the world. First, we need to validate that the game has everything it needs to understand how your prison works. The Validation Tool checks that your map has all the essentials. You can use it as a checklist as you work on your prison to ensure that you’ve got all the mandatory kit, and you’ll be required to pass the validation check before you can publish your prison. To run the validation tool, go to “Finalize” > “Validate”. Once run, the validation tool will detail the additions / changes you need to make to ensure that your map is playable. 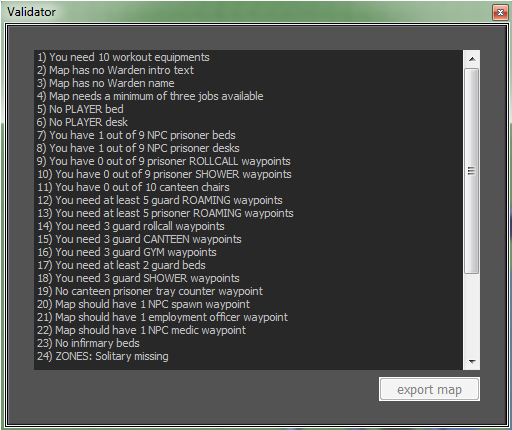 After you’ve satisfied the validator gods, you’ll be given the option to “Export” your map. This option does not make your map available to other players, it simply converts your prison editor project (.proj) into a file that the game can read as a map (.pmap). You can then use that file to play your map in your own copy of The Escapists by placing it in your Documents\The Escapists\Custom Maps folder. Start a new game, choose the Steam Workshop tab and select your map – give it a whirl! Just be sure to save your project before exiting the editor!!!  You’re likely to find things that you want to change when you first play your map. Don’t be discouraged – this is all part of level design! As you play, take note of anything that’s not quite right so that you can make the changes you need to in the editor. You can access your map to make those changes by opening the editor and loading the project that you saved before exiting via the “Recent” option under “Project” on the main menu. Once you’ve tweaked, tweaked and tweaked some more – you’ll be ready to open your prison’s doors and the promptly shut them, lock them and laugh as prisoners from across the world mash their keyboards in a vain attempt to best your level design skills. Huzzah! |